Feb 24, 2012

Authentic Cooking Experiment: In Search of The Truly Great Chocolate Chip Cookie


Everywhere you look these days there are recipes that claim to make the BEST chocolate chip cookie! Since we all know they can't all possibly be the BEST, I decided once and for all to put them to the test. The three recipes used below seems to be the most popular, created by very creditable sources. In order to conduct a fair comparison, they were all made at the same time and sampled within a short period from each other. The first batch came from the recipe of Jacques Torres. The unique concept of this recipe is the use of pastry & bread flour instead of AP. The idea behind this is two fold, one the low protein content in pastry flour is crucial to producing a very tender finished product. However it is the bread flour, with it's high percentage of protein that helps produce the wonderfully well-risen, chewy texture.

Ingredients
1 pound unsalted butter soften
1 3/4 cups granulated sugar
2 1/4 cups packed light-brown sugar
4 large eggs
3 cups plus 2 tablespoons pastry flour
3 cups bread flour
1 tablespoon salt
2 teaspoons baking powder
2 teaspoons baking soda
1 tablespoon pure vanilla extract
2 pounds bittersweet chocolate, coarsely chopped
Directions
- Preheat oven to 350 degrees. Line baking sheets with parchment paper or nonstick baking mats; set aside.
- In the bowl of an electric mixer fitted with the paddle attachment, cream together butter and sugars.
- Add eggs, one at a time, mixing well after each addition.
- Reduce speed to low and add both flours, baking powder, baking soda, vanilla, and chocolate; mix until well combined.
- Using a 4-ounce scoop for larger cookies or a 1-ounce scoop for smaller cookies, scoop cookie dough onto prepared baking sheets, about 2 inches apart.
- Bake until lightly browned, but still soft, about 20 minutes for larger cookies and about 15 minutes for smaller cookies.
- Cool slightly on baking sheets before transferring to a wire rack to cool completely.

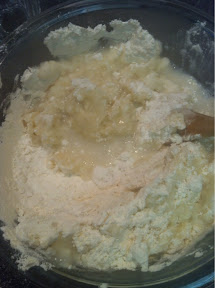
As the mixture came out of the mixer to be chilled in the fridge, the texture is clearly drier and clumpier than the typical dough.
My second batch came from the recipe of America's Test Kitchen. The ingredients were typical of a chocolate chip chip recipe with AP flour, brown sugar, egg and butter. However the key different is the handling of the butter, which is required to be completely melted first before incorporated into the sugar. This resulted in an more liquid consistency than the precious batch.


The finished dough was light in color with a shiny coat due to the melted butter. This also translated into a slightly fluffier texture that looked promising.


Ingredients
2 cups plus 2 tbsp. all-purpose flour
½ tsp. baking soda
½ tsp. salt
12 tbsp. unsalted butter, melted and cooled until warm
1 cup brown sugar, packed
½ cup granulated sugar
1 large egg plus 1 egg yolk
2 tsp. vanilla extract
1 ½ cups semi-sweet chocolate chips
Direction
Adjust oven racks to upper and lower-middle positions. Preheat oven 325. Line two cookie sheets with parchment paper.
Whisk dry ingredients together in a medium bowl; set aside. With electric mixer, or by hand, mix butter and sugars until thoroughly combined. Beat in egg, yolk, and vanilla until combined. Add dry ingredients and beat at low-speed just until combined. Stir in chocolate chips.
Roll a scant half-cup of dough into a ball. Holding dough ball in fingertips of both hands, pull apart into two equal halves. Rotate halves 90 degrees and, with jagged surfaces facing up, place formed dough onto cookie sheet, leaving ample room between each ball. Bake, reversing position of cookie sheets halfway through baking, until cookies are light golden brown and outer edges start to harden yet centers are still soft and puffy.
The last recipe was found on http://www.tastygardener.com/?cat=360. Though the source may not be as reputable, the recipes on there looked promising and thus worth a try. In addition, it was very similar to the American Test Kitchen version with slightly differently ratios in wet to dry ingredients.

Ingredient
1/2 cup butter, softened
1/3 cup packed dark brown sugar
1/3 cup white sugar
1 egg
1 teaspoon vanilla extract
1 1/8 cups all-purpose flour
1/2 teaspoon baking soda
1/2 teaspoon salt
1 1/4 cups semisweet chocolate chips
Direction
1. Preheat oven to 325 degrees F. Lightly grease 2 large cookie sheets with butter.
2. Cream the butter and sugars together in a large bowl. Beat in the egg and vanilla extract until well blended. Sift together the flour, baking soda, and salt; gradually blend into the batter.
3. Stir in the chocolate chips. Drop by rounded teaspoonfuls onto the cookie sheets, about 2 inches apart.
4. Bake in preheated oven for 10 to 12 minutes, or until the cookies are golden brown. Remove from the oven, and transfer the cookies to cooling
racks.
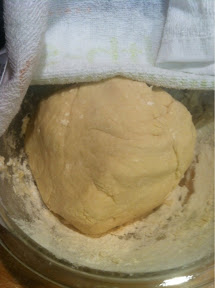
The combined dough seemed moist and smoother, and despite the dark brown sugar used, still came out a light creamy color.


The freshly baked cookies were all slightly different but all a little disappointing. First off the first recipe yield a cookie that was more crispy than chewy. When cooled it produced a brittle-like texture. This was not surprising given the dryness of the initial finished dough. However it was not what I am seeking in a cookie and I'd rate this recipe 5 at best.


The second recipe was a little more promising as it was softer and chewier when first out the oven. Yet after just a little while the cookie became hard and dry. So unless you can eat a few dozen cookies in 5 mins this recipes is also mediocre at best.


The final recipe was not much better. When fresh it tasted very similar to the second batch, however it unfortunately also held the same fate when cooled. At last I sadly realized that none of these will be my GO TO recipe.... Guess it's back to the drawing board.

Feb 20, 2012

Authentic Cooking Experiment: Red Velvet Cupcakes


Cupcakes are awesome, however I never understood when anyone would want one that is soaked with red dye. Yes, the color is pretty, but why make an unhealthy food even worst? However given that it's Valentines day and these are one of my husband's favorite I thought the timing to be perfect. So I used the recipe as laid out by the Georgetown Cupcakes.

Ingredients:
3 1/4 cups all purpose flour
1 tsp salt
12 tbs unsalted European style butter at room temperature
1 3/4 cups sugar
2 large eggs, at room temperature
3 1/2 tbs red food coloring
1 tsp pure vanilla Madagascar Bourbon extract
2 1/2 tbs cocoa powder sifted
1 1/2 cups woke milk at room temperature
1 1/2 tsp baking soda
1 1/2 to apple cider vinegar
Cream Cheese Frosting
4 tbs unsalted European style butter at room temperature
1 cup confectioners's sugar sifted
1/4 tsp pure vanilla Madagascar Bourbon extract
6 oz cream cheese at room temperature
Directions
Preheat oven to 350F. Line cupcake pan with baking cups.
Sift together the flour and salt and set aside.


In the stand mixer cream together the butter and sugar at medium for 3-5 min or until light and fluffy.
Add the eggs one at a time, mixing slowly after each addition.


Using a whisk, whisk together the food color, vanilla and cocoa powder. Slowly add this to the mixer bowl, mixing slowly until well incorporated.
Add 1/3 of the flour, followed by 1/3 of the milk and mix. Repeat. Stop to scrape down the bowl as needed. Add the last 1/3 of the flour, followed by the last third of the milk, and mix until incorporated.


In a small bowl, add the baking soda to the apple cider vinegar. You will see the baking soda and vinegar fizz up. Mix thoroughly and add this reaction to the batter. Mix until just incorporated.


Use a standard size ice cream scoop, scoop the batter into the pan so each is 3/4 full. Bake for 16-18 min or until toothpick comes out clean. Cool on wire rack before frosting.


Cream the cream cheese, sugar and butter until fluffy. Fill into a pipping bag to decorate.

The cupcakes came out a little denser than I expected. I think it was mainly due to the fact that the butter was still slightly hard before I creamed it. This made the process harder. In addition I was so afraid of over whipping the cream mixture that I think I actually under creamed it. This unfortunately meant the air bubbles that is crucial to making a fluffy cupcake never really formed. In addition, I also thought the 3 1/2tbs red color was excessive as that was pretty much the whole bottle found in the store. For my next batch, I'm going to tweak it slightly by decreasing the coloring to 2tbs and make sure all ingredients are at room temperature beforehand.

Authentic Cooking Experiment: Braised Short Ribs w/ Potato Purée and Swiss Chard


Beef short ribs is one of my favorite cuts, as they are tender and meaty. However to make a good braised short rib takes time as most recipes calls for them to cook in the oven for about 3 hours. In addition, often they are required to be coated in a rub the night before. So why bother going through all this trouble? Because the results is the most succulent and moist piece of meat ever to be served. As for the actual recipe, this dish was made following Suzanne Goin's.

Ingredients:
6 beef short ribs, 14 to 16 ounces each
1 tablespoon, and 4 whole sprigs thyme
1 tablespoon freshly cracked black pepper
½ cup extra-virgin olive oil
1 cup diced onion
1/3 cup diced carrot
1/3 cup diced celery
2 bay leaves
2 tablespoons balsamic vinegar
1½ cups port
2½ cups hearty red wine ( I used a Cabernet)
6 cups beef or veal stock
4 sprigs flat-leaf parsley
2 bunches Swiss chard, cleaned, center ribs removed
Potato purée (recipe below)
Horseradish cream (recipe below)
Kosher salt and freshly ground black pepper
Potato purée
1½ pounds russet potatoes
1½ pounds Yukon Gold potatoes
¾ cup heavy cream
¾ cup whole milk
8 ounces (2 sticks) unsalted butter, cut into chunks
Kosher salt
Horseradish cream
¾ cup creme fraiche
1 tablespoon prepared horseradish
Kosher salt and freshly ground black pepper

Directions:

Season the short ribs with 1 tablespoon thyme and the cracked black pepper. Coat the meat well, cover, and refrigerate overnight.
Take the short ribs out of the refrigerator an hour before cooking, to come to room temperature. After 30 minutes, season them generously on all sides with salt.
Turn the oven down to 325°F.
When it’s time to cook the short ribs, heat a large sauté pan over high heat for 3 minutes. Pour in 3 tablespoons olive oil, and wait a minute or two, until the pan is very hot and almost smoking. Place the short ribs in the pan, and sear until they are nicely browned on all three meaty sides. Do not crowd the meat. When the ribs are nicely browned, transfer them to a braising pan. They should lie flat, bones standing up, in one layer.


Turn the heat down to medium, and add the onion, carrot, celery, thyme sprigs, and bay leaves. Stir with a wooden spoon, scraping up all the crusty bits in the pan. Cook 6 to 8 minutes, until the vegetables just begin to caramelize. Add the balsamic vinegar, port, and red wine. Turn the heat up to high, and reduce the liquid by half.
Add the stock and bring to a boil.


Pour the liquid over the short ribs, scraping any vegetables that have fallen on the ribs back into the liquid. The stock mixture should almost cover the ribs. Tuck the parsley sprigs in and around the meat. Cover tightly with aluminum foil and a tight-fitting lid if you have one. Braise in the oven for about 3 hours.


The meat is done when it will yield easily to a knife. Taste a piece if you are not sure.
Let the ribs rest 10 minutes in their juices, and then transfer them to a baking sheet.
Turn the oven up to 400°F.
Place the short ribs in the oven for 10 to 15 minutes, to brown.
Strain the broth into a saucepan, pressing down on the vegetables with a ladle to extract all the juices. Skim the fat from the sauce and, if the broth seems thin, reduce it over medium-high heat to thicken slightly. Taste for seasoning.

Swiss Chard:
Heat a large sauté pan over high heat for 2 minutes. Tear the Swiss chard into large pieces. Add 3 tablespoons olive oil to the pan, and add the Swiss chard. Season with a heaping a teaspoon salt and a pinch of ground black pepper. Cook for a few more minutes, stirring frequently, until the greens are tender.

Potato Puree:
Place the potatoes, whole and unpeeled, in a large sauce pot. Add 2 tablespoons salt and fill the pot with cold water. Bring the potatoes to a boil over high heat, turn down the heat to low, and simmer about 45 minutes, until tender. One type of potato may be done before the other, so check doneness and remove one variety first, if necessary. When the potatoes are cooked through, strain them, and set them aside to cool for 10 minutes or so. Heat the cream and milk together in a small saucepan, then turn off the heat. When the potatoes have cooled, peel them and pass them through a food mill or potato ricer. Put the riced potatoes in a heavy-bottomed pan. Heat them over medium heat a few minutes, stirring continuously with a wooden spoon, to dry them out a little. Add the butter slowly, stirring constantly. Season with 2½ teaspoons salt. When all the butter has been incorporated, slowly stir in the warm cream mixture until you have a smooth purée. Taste for seasoning.

Horseradish Cream:
Combine the crème fraîche and horseradish in a small bowl. Season with ½ teaspoon salt and pepper. Taste for balance and seasoning.

Verdict:
The meat was tender as expected and fell off the ones once out of the oven. However if eaten alone it was slightly bland and could use a little more salt in the braising liquid. The potato purée was too creamy for my taste as both the butter and cream mixture provided too much of a rich texture. My favorite side was actually the Swiss Chard which resembled spinach in acidity but provided a nice chewy contrast to the potatoes. In the end the various compartments of the dish came together well and complimented each other. I would definitely make short ribs again, just not sure if I would use this recipe.


Feb 12, 2012

Authentic Cooking Experiment: Chinese Scallion Pancake


Crunchy, flaky, warm and savory, that is how a perfect scallion pancake should be. When I was young in Shanghai I remembered buying them fresh from the street stalls as they were cooked. Unfortunately as with many things here in Philly, a good warm freshly cooked scallion pancake is hard to find. The restaurants that does serve them here have marked up a cheap street food to something that is grossly over priced. Given the simple ingredients required for this dish, you can easily make a dozen pancakes for less than a buck! In addition they freeze nicely when wrapped between wax paper and stored in a ziplock bag.

As for the ingredients they are really quite simple:
3 cups of flour
1/2 tsp of salt, more for later
2 cups of boiling water
sesame oil
1 cup of finely sliced scallion, about a bunch

Mix the flour and salt together adding the boiling water to the flour slowly while mixing. Mix thoroughly to form a dough with a wooden spoon, use your hands when it becomes slightly formed.


Finish by kneading with your hands for 5 minutes or until the dough no longer stick to your fingers. Add more flour if needed. Form it into ball, cover and let rest in the mixing bowl for 20 minutes.


Roll into a log, cutting it into 12 pieces, pressing it down slightly before rolling each piece into a round disk. Brush with sesame oil (about 1 tsp per pancake) and sprinkle with scallions and salt.


Roll into a cylinder and then wrap and coil. Cover and let it rest for 20 minutes. Flatten the dough with your hand and then roll it out again.


Make sure it is thin especially on the edge. Heat up a frying pan over medium heat with about 1.5 tbs of oil.


Pan fried both side until golden brown. Cut into wedges and serve.

Tips:
- It's easier to spread out the sesame oil with the back of a spoon
- Even though the white parts on the scallion is really flavorful, it is harder to roll with them in it.

Feb 9, 2012

Authentic Cooking Experiment: Green Tea Mochi Ice Cream


There are many great desserts out there and I'm sure everyone has their favorites, mine is hands down Mochi Ice Cream. These little ice cream ball wrapped with Japanese rice cake offer a sweet melty center with a slightly chewy outer skin. The combination is simply delightful. However as I'm sure most people who has brought these have realized just how expensive they can be (I think in Philly they are about $4-$5 for 6 pieces). In one sitting I can eat about 3 which is more than I would like to spent on desserts in a month! So instead of giving up these treats I simply decided to make my own.

The base of my Mochi Ice cream was adapted from Japaneseicecream blogspot which despite the units being in metrics was easy to convert on my kitchen scale.

Ingredients:
Sweet rice powder 50g (about 1/4 cup)
Sugar 100g (about 1/2 cup)
Water 100ml
Ice cream 150-200g
Cornstarch as needed to prevent sticking

Instructions:

Spread cornstarch onto a cutting board to coat.
Put the sweet rice powder into a bowl, glass is best, add the water little at a time until it is mixed well. ( i didn't have to use all the water) Then add the sugar and mix it well again.


Next, cover the bowl with plastic food wrap (leave a breather gap) and cook in the microwave - medium for 2 minutes. Mix with a wooden spoon (dip it in water) and cook for around one more minute.
You can tell the dough is ready when it turns shiny and smooth.


Dip your spoon in water then roll out the sweet rice dough on a cutting board as flat as possible or about 1/4 inch thick. Remember the dough is hot so


take care and use corn starch so it does not stick to the board or rolling pin.
Leave to cool a little and when the dough is cool enough, cut it into rounds , use a bowl for the size.
Freeze the dough, cover each layer of mochi sheet with plastic wrap and dusted with cornstarch then put it into the freezer.


Put the ice cream onto the centre of the mochi sheet. For a nice round mochi use an ice cream scoop. Wet the edge with a little water to fold together.


Fold and join the edges and then back in the freezer until it’s eating time!


Mine were slightly smaller than those found in the stores so the mini Mochi fit perfectly into a mini cupcake pan to be frozen.


Theses bite size treats were delicious and now I never have to buy the again. Another beauty of this process... The flavor of the ice cream can be alter to what ever flavor your heart desires.

A few tips:
- This does take a little work so it maybe optimal to increase the ingredients to make multiple batches at a time.
- I personally found the Mochi a little sweet so next time I will decrease the sugar slightly, however this is really based upon how sweet your ice cream is itself.
- Make sure the ice cream is frozen hard because once scooped out onto the Mochi skin it will melt fast so work fast.
- the Mochi skin will not dry out in the freeze if wrapped in plastic wrap and placed in a air tight container so the skin can be made in advance a day or two
- Cut the molds big so you can fill it with more ice cream, and they are also easier to wrap. Most cookie cutters are too small for this task.